CLICK HERE FOR FREE BLOGGER TEMPLATES, LINK BUTTONS AND MORE! »

Wednesday, January 23, 2013

Our Cold Winter's Day Project

I was flipping through one of the 3 Oriental Trading catalogs that came in the mail a couple weeks ago and I came across this picture in the Valentine's Day book:
It has a cute little saying on the trunk, and I just knew I wanted to make something similar with my girls. (I'm a HUGE fan of handprint art!)
I'm sure you're aware of the freezing cold temperatures that are going around and today was no exception. I woke up with a killer sore throat, knew I didn't want to do much so decided today was the day for our handprint project.
I raided my scrapbook papers and I just happened to have a 16X20 frame that I picked up at the Goodwill for $2.99. (don't you just LOVE the Goodwill??) I grabbed a piece of posterboard from the Dollar Tree to use as the background and the rest of my handy tools.
I grabbed several shades of green so the girls could have their choice, plus I originally intended for the picture to have my husband's and my handprint but ended up not having enough room for all 4. Poo!
I traced everyone's hand/arm onto cardstock for a template. (unfortunately Daddy was at work so we had traced his handprint ahead of time)
I needed a tree shape so I just whipped up a drawing on cardstock and cut it out.
Then I had to trace it onto the girls' choice of green paper. This required a LOT of cutting on my part and they were getting restless so I handed them some scrap paper and some scrapbook scissors and let them have at it!

Now, here's where my dilemma came in. I needed red paint for their fingerprint hearts, but all I had was watercolors. I was afraid that would be too watery and make my paper bubble and wave.  So I ended up taking a red WASHABLE marker and rubbing it on their fingers! LOL  Worked just fine and was super easy to clean up when we were done. (well, maybe not SUPER easy, we're all still walking around with red fingers...)
I took their fingers and pressed down on the tree, overlapping to make a heart shape.

I then used my trusty ATG gun to adhere the trees to the posterboard wherever I wanted them.  this is what it looked like when I was done.
It just looked like it was missing something to me. I wish I had thought to put some green paper below for grass or something but alas, I didn't.  I had some scrapbook paper that was covered in glittered clouds so I decided to cut a few of them out and add them above for a sky.
And here's our finished project. What do you think??
I LOVE IT!! I put it on my mantle and I'm going to decorate for Valentine's day later. I love that I have my girls' almost 4 and 5 year old handprints preserved forever. I know I'll look back at it someday and shed a tear at how little they once were.


Wednesday, November 14, 2012

Rapunzel--Let Down Your HAIR!! Our Tangled Party

I love that my little ones are wanting to get so involved in their birthday party planning. This year was no exception.  We've known for months that my oldest wanted a Tangled party for her birthday theme.  I did the normal internet searches and pinned ideas to Pinterest.  I found so many things I wanted to do and make.  Lets face it though, there's really only so much you can do with this theme and everyone has pretty much done them.  So I took my favorite ideas and created a beautiful party for my girl.. <3
I will do my best to link to all the sites I used ideas from. I hope that I don't forget anyone. I try my best to Pin all ideas I want to use. Makes it easier to give credit where credit is due.  First, some pictures!

We set the mood of the party early on with our invitation:
I got the basic idea for these invites from The Purple Patch.
I have a wonderfully generous friend that offered to make my darling girl her very own Rapunzel dress if I purchased the materials. She did an OUTSTANDING job and it was way more than I ever expected it to be! I can't thank her enough!
I stress about the cake every year, and this year was no exception.  This one wasn't as hard as I thought it was going to be and for once I didn't fight with the fondant while making it.  The look on my daughter's face was PRICELESS when she saw this cake!
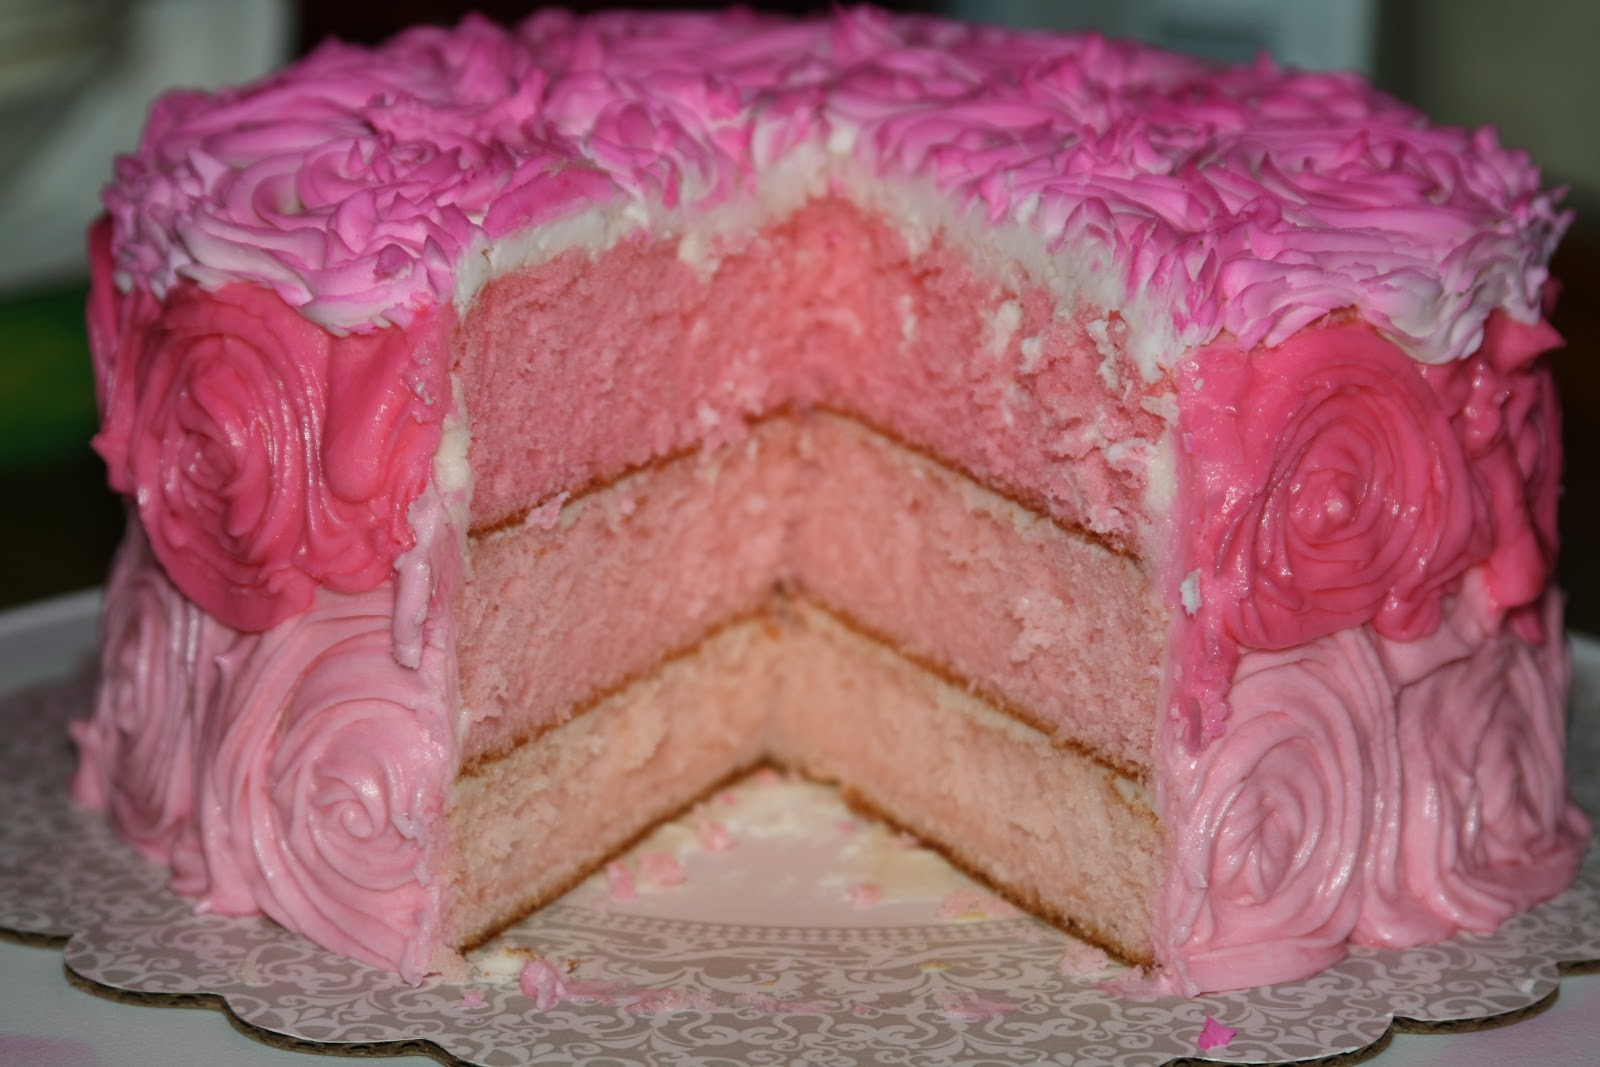
I made that Rapunzel cake specifically for the birthday girl, so I needed to make another cake for the rest of the party goers to enjoy.  I saw this cake on  Beantown Baker and just knew I wanted to replicate it. I just used a regular Duncan Hines white cake mix and made my own buttercream frosting.  The second picture looks really dark (and more blue) but you can thank my flash for that. The first picture is more true to life of the pastel color of the cake. It was SO pretty!!

Our dessert table setup:
Maximus apples (rice krispie treats flavored with Jello) Photo here: Maximus apples
Rapunzel's Stolen Crown Oreos (the only idea I DIDN'T get from the internet! LOL)

"Paintbrush" Pretzel Rods (since Rapunzel liked to paint). I saw similar on The Purple Patch as well as some Lalaloopsy parties I've seen online.
Peanut butter filled chocolate cupcakes-I made the sun cupcake toppers on my Cricut
I incorporated some pretty purple candies in my new jars (found at the Goodwill, .99 each for the 2 tall ones, and .49 for the small one-WOOT!)
Of course we had to have Magic Golden Flower punch (yellow Wedding Punch, idea from The Purple Patch as well, and I just happened to have the same serving pitcher, lol) which I served in small mason jars with decorative cutout lids and purple striped paper straws. I wrapped small white doilies around them and tied with pieces of jute:
I knew I had to incorporate Mother Gothel and hazelnut soup somewhere, but the soup just didn't even sound appetizing.  Instead I decided to serve Hazelnut creamer with our coffee:
Of course, water bottle labels had to be made:
For dinner I served "Rapunzel's Golden Hair (spaghetti) w/ braided breadsticks:
As you can see in the above picture I made some large prints that I found on Google and framed them. This picture had the words printed to the Magic Flower song.
I forgot to take a picture of them, but we ate on "frying pan" paper plates. I got the idea from this site: Paper plate frying pans

A few other pictures of our wall decorations, food table, and room that we set up as our Snuggly Duckling tavern:
I made luminaries out of frosted vellum and cut suns just like the movie out of the same. Made for cute centerpieces. I actually put battery operated tea lights in each of them, but it never got dark enough to even see them.

 I found this beautiful Rapunzel photo on Fanpop and had it enlarged to a 16x20 poster to use over the food table. Best part is, it's now in a large frame hanging on my daughter's bedroom wall!

I made this Snuggly Duckling sign out of Foamboard. I freehand drew it on, then painted with watercolors. I wish I had gotten a better picture than just my Ipod:
The kids favors were Rapunzel braids for the girls and Knight armor for the boys:

The goodie buckets I found in Target's Dollar spot. They're pretty purple glitter buckets from the Halloween section. They were filled with watercolor paints, Rapunzel pencils I found after Valentine's Day on clearance, small sticky hands (since Flynn Rider was a thief, sticky lizards to represent Pascal, crayons, light up bouncy balls, some bracelets and rings for the girls and a beautiful Rapunzel necklace I found on Etsy-little princess bling:
And what kind of Rapunzel party would it be if we didn't release lanterns for the princess? This was such a fun thing to do. I found these lanterns on Amazon, paper lanterns, on sale for $8.99/10. They were AMAZING and HUGE!!! The kids loved them (and secretly I think I loved them more!)
If you look closely at the above picture, you can see 3 other lanterns way off in the distance. We live way out in the country and had plenty of rain for a week straight before the party so we were comfortable releasing them. We could actually see them flicker out and fade before they went very far. Such a great way to end the night!

And yet another year, another party is done. I love seeing all my hard work and planning come together and I love even more seeing my little girl's eyes light up with delight. This is our last year "together" since next year she'll be starting kindergarten and gone most of the day. (sniffle, sniffle)  Gotta make it a good one!! <3

If you want the links to more Tangled party ideas I didn't get to use, take a look at my Pinterest board: For the Love of Rapunzel


Let them eat cake!!

I love my Mom.  :)  My birthday is 2 days before hers.  I vividly remember birthday parties she threw for me as a kid, some in the summer even, so as to avoid the snow and frigid New England winters!  She used to make me my favorite cake-a coconut pudding cake. Oh my word it's delicious!  Well, this year for my daughter's 5th birthday I made a beautiful purple rosette ombre cake that was TDF.  I decided I wanted to make my Mom one for her birthday, but in her favorite color; PINK!! And who doesn't love pink?
I did some research on these cakes before my daughter's party and came across a photo by Beantown Baker who gives a wonderful description on how to make this cake. I believe she has a Youtube video as well, but I was good to go with just her photos/descriptions.  I made a regular white box Duncan Hines cake mix that I tinted in 3 layers, as well as the frosted rosettes for icing. I think it came out wonderful and my Mom was so delighted that I made a special trip to her house on her birthday and that I made her one of these cakes.
(My favorite Instagram picture of her cake)
 I found wonderful sparkler candles to add.
 And it was just as pretty on the inside! Gosh my flash just killed this one. It was so much for soft and muted like the first Instagram picture.
So glad I was able to make my Mom's special day wonderful and doing something kind for her in return for all she's done for me!

Tuesday, August 14, 2012

Silhouette Portraits--LOVE!

Seriously, I have been wanting to make these since my kids were BABIES!  I don't know why it took me so long or how it kept getting put on the back burner, but I guess now I need to just be happy that I finally made them. And I'm SO happy with how they turned out and they look exactly like each of my girls (that is the purpose, right?)  I read tons of blogs and things online on how to turn a photo into a silhouette, but most Photoshop tutorials were way beyond my expertise and knowledge. So I set out to figure it out myself.

I still operate Photoshop Elements 6.0-Hey, if it ain't broke, don't fix it!  I'm sure the newer versions have all kinds of new doohickies, but I'm happy with this one.

I took a profile picture of each of my girls against a blank wall.  I then opened the photo in PSE and converted each to black & white. This made it much easier to accomplish what I was about to do.  I then selected the Paint Bucket tool and and used the dropper to match the background color and filled it in to cover any shadows I had.  Then I selected the Paint Bucket tool again and picked black as my main color and began filling in the profiles of my girls.  This definitely took some patience and time since it would sometimes fill in the background or areas I didn't want black so I had to undo it.  But this worked pretty well!
Now, print your photo out onto cardstock. Mine looked like this after I cut around the silhouette:
See? Don't they look like little people?? I'm in LOVE!
I then took those cuts and traced them onto actual black cardstock and cut them out with the smallest scissors I have to preserve every detail (hair, eyelashes, it's all there!)
I had picked up a couple frames on clearance at Michael's but wanted them to be black as well, so I took a can of spray paint to them. Ten minutes later, Whala!!
I adhered the black cardstock cuts onto another new sheet of white cardstock, placed them in their new frames and this is what I have:
I really am SO happy with them! My 3 yr old is on the right and even though I took their pictures in the exact same spot, exact same spacing, you can see how much chubbier her face is than my 4 1/2 yr old. These reflect them PERFECTLY and I'm so happy to have them done!
I hope I've been able to explain the Photoshop actions I used. I'm still learning myself but I'm amazed at its capabilities!
Now go take some profile pics of your little ones before another day passes and they change some more. Doesn't it go by way too fast? :-(


Sunday, August 5, 2012

Frayed Fabric Covered Flip Flops

I really hate that I'm not able to devote more time to my blog.  With a toddler and almost 5 yr old, I feel like I'm stretched to the limits.  I decided to do something to INCLUDE my kids this time so I could take pictures and craft at the same time. Win, win!  I've seen these for years now, and my oldest daughter is so into flip flops this year that I thought she would just love them.  Soooo, today we're going to make fabric covered flip flops.  I found cheap pink flip flops at Dollar Tree for $1 each so that was the easy part. I have a huge fabric collection so both girls were able to just pick out what they wanted to use from that so essentially this craft only cost me $2! :-)

Supplies Needed:
     Flip flops of your choice
     1 or more coordinating fabrics
     Ribbon if you choose to put a bow on top (I have ribbon pictured on each but only used one)

First I had to figure out what size I wanted my strips to be. I ended up decided on 1" wide strips. Take your fabric and make a 1-2" cut on the selvage edge to eliminate anything uneven. I've already used this fabric so I only had to remove a small strip. 
You can see that I marked out 1", 2", 3", etc on my fabric.  To be honest, I cut WAY too many strips to start with. I ended up with a huge pile of strips left at the end of this project.. (I'm going to just save them in case any fall off of their flip flops) By the 2nd pair, I realized I only needed to tear 2-1" strips the length of the fabric and had just enough. So, after you've marked your fabric, you're just going to grab hold of one end and tear a strip all the way down to the bottom.
 My 4 yr old was super thrilled that she was finally able to help do something (even though this was the ONLY step they could really help with)

  After we tore the strips I had to decide how much "fringe" I wanted. I played around with 4-5" and my oldest said she wanted "Lots" of "ruffles" so I ended up going with 5" pieces on hers. Cut your long strips into the size you want until you have this:
The rest is easy (though a little time consuming). Tie the strips into a knot around the strap of the flip flop until you've covered as much as you want of it.
I only tied each strip once, tightly, all across and scrunched them together until we had this:
I ended up cutting a few strips of the green ribbon and adding it into the flip flops on the right to add some more color.  I picked the color fabrics for my youngest daughter's and they remind me of watermelon (pink and green).  I also ended up only cutting her fabric into 4" strips so they weren't swallowing her feet! LOL
Now, both pairs took me about 2 hrs from start to finish. Not too bad. My oldest daughter can't get enough of her new shoes and wants to wear them with EVERYTHING! <3  My youngest? Says they hurt her feet and could care less about them. Yup, they're sisters and complete opposites!

Hope you've enjoyed my little summer craft. Now go make yourself a pair!