CLICK HERE FOR FREE BLOGGER TEMPLATES, LINK BUTTONS AND MORE! »

Thursday, March 22, 2012

Gotta have my morning coffee drink

So, I'm not an "ordinary" coffee drinker.  Meaning, I'm not a big fan of hot coffee.  I'll drink it if it's the only thing there (or if I've moved into an igloo for a bit and I'm freezing) but it's not my first choice.  Now, mention some sort of iced coffee drink and you've got my complete attention!!  It originally started with my love of French Vanilla iced coffee from Dunkin' Donuts, but once I moved further south, there were no D&D's to be found. Very.Sad.Day.
I was left to substitute my coffee addiction with iced coffee from McDonald's which, in my opinion, not even the same ballpark! But it would do.  A blended, on ice drink, would make me even happier.  Before you mention Starbucks, I will add that while I love my coffee drinks, I don't want to feel like I'm drinking sludge.  I need some sweetener in there too.
A friend introduced me to this recipe for my own blended coffee drink at home some 5-6 years ago and I've been making it ever since.  And, everyone that I give the recipe to loves it.  So I thought I'd share it here with you as well.  You may find that you'll need to tweek it to your own liking, but as I write this, to me it's *PERFECTION*!! 

You'll need:
2 teaspoons instant coffee
2 cups of 2% milk
2 sweet 'n low packets (or other sweetener)
1 packet of hot chocolate
(this could obviously be made a little healthier if you substitute lowfat milk & lowfat hot chocolate but I stand by my perfected recipe!) lol

I pour the milk into my blender, add all of the dry ingredients to it, put in as much ice as you want and blend that baby up!  
Pour into a pretty insulated cup w/ a straw and you're on your way! (this recipe will make 2 servings) 
I couldn't live without this recipe.  I need my drinks to be ice, ice cold and this does the trick for me.  I also like mine a bit more on the coffee side, than the chocolate side, so I add a bit more instant coffee to mine.
Hope you enjoy it as much as I do! Happy drinking!


Friday, March 16, 2012

Happy St. Patrick's Day!!

I really am such a night owl. It's now 1:44 am and I just finished my little Sophie's St. Patrick's Day shirt.  I wanted to applique a simple shamrock onto a white tee for her.  I bought a brand new shirt to use for this project, but it occurred to me that I've held onto several tees that have gotten a spot on them (I despise stains on my kids' clothes) and I was able to find one with a small spot in the middle, easily hidden by the applique. Yay!! Win, win.  I get to recycle a shirt and she still gets the new one.
I decided I wanted the shape to be around 6".  I cut a block of fabric and ironed it onto a piece of Heat 'n Bond.  I then turned to my Cricut and SCAL2 for this one and stuck the Heat 'n Bond directly to my Cricut mat.  The SCAL2 shapes library has a shamrock (clover) in it so, keeping proportions, I set my size height to 6.50". which gave me a width of 5.779".  Once it was done cutting, I was able to peel my applique directly off the mat and iron it onto my shirt.
This was only my 2nd time doing an applique and I think it came out much better than the 1st! LOL  It's not perfect, and I can see where I made a mistake, but really, she won't care.  She's just going to be happy that Momma made her a special shirt!


Hope everyone has a Happy St. Patrick's Day!!  I can't wait to smell my corned beef & cabbage cooking up in the crock pot later (even though my hubby hates it).  The girls & I love it and hey, ti's only once a year!

Monday, March 12, 2012

Our Big Monkey Luau is here!

My daughter's 3rd birthday was just this past weekend and I'm so happy with how everything turned out.  I just wanted to share some pictures with you.  I think we ended up with  more of a Luau than a MONKEY Luau like I originally planned, but everything was so pretty and girly that I couldn't be happier (and the birthday girl was loving it too!).

I made everything myself.  The dessert table contained banana cupcakes with chocolate frosting, mini monkey breads, "monkey kisses" (hershey kisses melted on top of pretzels topped with an M&M), chocolate covered pretzels, chocolate cupcakes with buttercream frosting, coconut cup "drink" cake pops, and white chocolate covered Oreos topped with fondant bananas from this Etsy shop.  Um, AMAZING!! They look so real with little speckles on them and everything:
I found these adorable monkey drinking cups on Amazon for the kids to use and I glued a hibiscus flower to their ear so they'd fit the theme.
These are the cake pops I made. They were very time consuming.  I got a new Babycakes Cake Pop maker around Christmas and decided to try it out for this party. Total FLOP! I don't know if you need to practice with this thing, or what, but they weren't even coming out looking circular, and were completely dry. So then I had to go back to the regular way of making cake pops and ended up adding too much cream cheese frosting for the amount of cake I had left.  I could only dip a few in chocolate before having to stick them back in the freezer. Ugh! But I'm happy with the end result!  I originally found these on 365 Cake Pops and just knew I had to  make them.


This was the birthday girl's special seat.  She gets to be right up in front of everyone so we can be sure to get lots of pictures.  We are definitely a picture taking family!

Here's the centerpieces I made for all the main tables. I painted cardboard tubes brown and made them look like palm trees, and cut Hula monkeys on my Cricut to hang from the branches.  They're stuck in a yellow metal bucket I found at the Dollar Store.

Here's what the entire room looked like set up.  We hung paper lanterns from the ceiling in coordinating colors.
I also set up a small area as a Photo Booth.  Oh my gosh, the kids LOVED it!  I won't share those pictures since they're not my children but they had a blast. I found tons of printable props online that I mounted to cardboard and glued sticks to.  SO much fun.  Our little area:

I made this special outfit for my little princess.  She calls it her toot toot (tutu). I know, so sweet, right?

One last view of the dessert table.
I so enjoy throwing these parties for my girls.  My husband thinks I go overboard, but, what does he know?? LOL


Saturday, February 25, 2012

Monkey Canvas

Still working on more Monkey Party items.  I have so many ideas I saved from the internet that I wanted to use.  I wanted something substantial to put over the dessert table and I came across this picture that inspired me:


I decided to take some pictures of my daughter in an adorable monkey suit my sister let me borrow, and mount them to stretched canvas to place over the table.  It really was an easy task and I had it done in under an hour I'd say.

Supplies you'll need:
Photos you want to use
Stretched canvas in the same size as your photos (I used 11x14 pictures)
Modge Podge
Foam brush, bowl/container to pour Modge Podge into

The first step is to coat your bare canvas with the Modge Podge using a foam brush. I was fairy liberal in my use, because I wanted to make sure the photo stuck well. I placed my photo on top of the canvas and smoothed it out with my hand and made sure it was evenly lined up on all sides. Let that dry completely. (mine took about 15-20 minutes)
Then you need to put another layer of Modge Podge directly on top of your photo.  I tried to put a thick enough layer on to cover it all, but without leaving a lot of "lines" with the brush. It's going to look pretty cloudy to begin with but trust me, it will dry clear.

After it's dry (again, maybe 1/2 hr or so), you'll have a beautiful canvas picture to hang, without the price tag of an actual canvas photo. I made 2 pictures this size and it cost me about $10 to make it. (I printed my photos online using a discount code, bought the Modge Podge at Michael's using a 50% off coupon and got 2 canvas' in a pkg for $5) I can't wait to hang them up at her party!!
Next will be to make a bunting to stretch above the photos just like my first inspiration picture.

Saturday, February 11, 2012

Monkey See, Monkey Do...

Today's post is about making cupcake toppers for our upcoming monkey luau party for our daughter's 3rd birthday.  I try to decide well in advance what the theme of their next party is going to be so that I have plenty of time to research ideas and pick things up as I go, rather than a huge expense all at once.  This years party inspiration started when I found this party line:


And yes, it was 50% off at the time too--Yippee!!  A friend mentioned it had a luau feel to it and I loved it so much I decided to go with it! So, Monkey Luau it is! =)

I only have one month until the big day so I started a couple days ago making things.  First up, cupcake toppers.  I rely on my trusty Cricut and SVG files for these.  First I had to decide what size I wanted them to be. I believe I went with 3" (keeping proportions) and cut those out, as well as their coordinating bellies, faces & ears.


This is what they looked like after they were cut. Please ignore my nasty Cricut mat, it's really on its last leg, but I'm making sure it's gets well used because, well, I'm cheap thrifty like that!
Next I had to piece them together.  Now this was the tedious part. Usually for small things like this I use my small Xyron machine, but for some reason it's MIA. Boo!  The only other thing I had on hand was a scrapbook gel glue. A little messy, but worked well enough.  Here they are after I attached those bellies and such:


I planned on then just adding mouths by hand & wiggly eyes, but they just looked so BORING to me! Hmmm, what did they need? I KNOW!!! HULA SKIRTS! What's a luau without grass skirts, right?  And boy, I thought the last step was tedious, this was even worse. LOL  I set my Cricut to cut out 1" wide trapezoids and then I had to hand cut fringe onto them to look like skirts. Boy, Martha Stewart had a great idea when she came out with fringe scissors. But alas, since I don't have any, I got to hand cut 24 mini grass skirts.  I then added a paper flower to the monkeys ear and WHALA!!!

 So, what do you think??  Apparently my daughter is in love with them because every time she sees them she runs and hugs me and says, "Thank you Mommy! Thank you for my monkeys!!"

Thursday, February 9, 2012

A Vintage Strawberry Shortcake Party

It really doesn't take much to railroad sway my children into a specific party theme each year because let's face it, they're still too young to catch on!  So for my oldest daughter's 4th birthday in October (yes, I'm super duper lazy behind when it comes to blog posts) I was able to talk her into a Strawberry Shortcake party.. And not that new, modernized Strawberry Shortcake that's out now, the adorable, vintage Strawberry Shortcake from the 80's (and whom my childhood bedroom just happened to be decorated in). Really, why do they have to change things? (shaking head)
So now the fun started--Can you believe my mother just happened to have saved the Strawberry Shortcake candle from my sister's 6th birthday party?? Here it is:

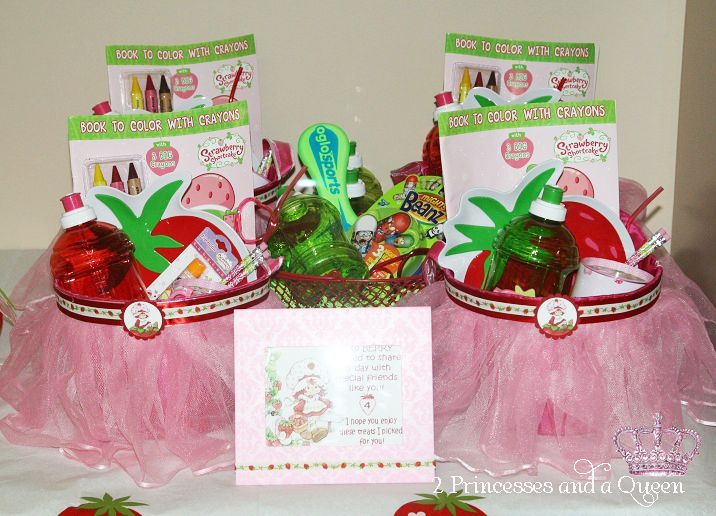
 She also happened to have a large roll of vintage SS ribbon that I used on my cupcake toppers and the kids goody baskets.
I found the image on Google, and imported it to Microsoft Office and made round labels that I then cut out with a circle hand punch. Aren't they pretty? :)

So I'm not going to go into all these details on how everything is/was made unless someone asks for the details. I'm just going to go ahead and post the rest of the pictures from the party. I make as much, if not everything, by myself and take such pride in creating these parties for my babies. 

Upcycled noise makers that I made "my own":
I always make all the hats for the kids and the birthday girl:
The kids (old and young alike) played the Bean Bag Toss and I handmade strawberry bean bags.  We also had a "Pin the strawberry on Strawberry Shortcake's hat" game as well as a pinata.

 I ended up running out of time while decorating this year. The snafu we ran into was another party rented the hall the previous night which is when we usually decorate. They didn't leave until almost 11 p.m. We got in there and decorated for about 3 hrs but had to get home to our girls. I tried to get back early enough the next morning but still ran out of time so I really wasn't happy with the way the dessert table looked. There were supposed to be balloons on either sides of the wall hanging and I would NOT have put the crockpot on there.
The food consisted of strawberry shaped chocolate lollipops, cupcakes, pink snowballs, various strawberry flavored cookies, strawberry swirl lollipops, sandwiches/chips & strawberry banana punch.

I had grandiose plans for the cake, but I'm not a baker by any means, and by 3 am I was fighting with fondant and just so frustrated.  Luckily I had made enough pink buttercream to be able to cover the entire cake so I settled gave up.  In the grand scheme of things, the cake actually fit in better with the vintage feel than what I had planned on making. Oh, that's right, I meant to do that! :)


 Goody baskets for the girls-These are actually Easter baskets I got on clearance after the holiday for .50 each!! What a steal. I added that same vintage strawberry ribbon my mother gave me and added in Strawberry Shortcake coloring books, a strawberry plate, SS banks, bracelets & adorable sunglasses.

 Strawberry shaped bubble containers from the Dollar Tree.
 Here's the room all decorated.  My sister had found me a deal on vintage curtains and a bed canopy that we used to decorate the windows and the dessert table.  They REALLY added to the feel of the room and I think it looked so girly and pretty!
 Happy Birthday banner I made:
 I made/stitched this apron for her to wear.  I got the inspiration (and a few other elements) for the party from Little Pumpkin Grace
  I made homemade strawberry freezer jam and strawberry shaped cookies for the adults to take home.  The strawberries came from our summer trip to the strawberry fields.


Happy 4th birthday, my beautiful angel!  The day I became your Mommy was the most blessed day of my life!

 I hope you enjoyed our party pictures. I tend to go overboard when it comes to photographing my kids. I'm still learning and really hope to become a better photographer...someday. Right now I'm just enjoying being Mommy.

Wednesday, April 27, 2011

MMMmmm, Cheesy Chicken Biscuits

Okay, so living out in the semi-boondocks we don't have access to high speed internet. My mother on the other hand, who actually DOES live in the boondocks, HAS high speed internet--Go figure!! So, I was heading to her house last night to upload a bunch of photos for an online printing deal and needed to have dinner ready for the Hubster and my girlsI remembered seeing this post from a friend, Cheryl (a.k.a. TidyMom) for Cheesy Chicken Biscuits and I thought it looked so yummy at the time but didn't have biscuits. I happened to get some Pillsbury Grands on sale for $.98 recently so I set off to make her recipe.

Ingredients you'll need:

1 stick butter 
1/2 C. Flour
14 oz. can Chicken Broth 
4-5 Boneless Skinless Chicken Breasts
1 C. Shredded Cheddar Cheese
Salt & Pepper to Taste
Milk (optional)
1 can Pillsbury Grands Biscuits


Cut chicken into bite sized pieces and cook thoroughly in skillet. I added a bit of salt & pepper to this step while the chicken was cooking.


Pour into 9x13 pan.  In a saucepan, simmer butter, chicken broth & salt/pepper until melted.


I turned mine up to a boiling state and added some of the liquid to my measuring cup of flour and whisked them together (I have a HUGE problems with lumps from my flour when I'm trying to make any type of gravy mixture so I learned from my Mom to mix into a paste in a separate container and then slowly whisk into my sauce) and then whisked the flour into the butter/broth combo.  You can add milk to think it out if it's too thick (I needed to).


Pour sauce over chicken in 9x13 pan. Sprinkle the cheddar cheese over the chicken/sauce and top w/ biscuits. Now, I don't know about anyone else, but EVERY.TIME I open a container of these biscuits, they scare the bajeebers out of me when they make that POP noise. It's probably quite comical for anyone standing around me!


Place in the oven and bake according to the directions for the biscuits. It was approximately 13-17 minutes or until golden brown but I would recommend baking it as long as possible without burning the biscuits because the part of the biscuit that sat down in the liquid was still very dough like and almost tasted not cooked to me. So definitely cook as long as possible.


Mmmm, dinner is served! I know my 3 1/2 yr old said she "loved it tons and ate bunches and bunches" so it had to be good (coming from Miss Picky!!) LOL
You could always serve with a side of vegetables if you want but this was filling enough for us with all those biscuits.


Stop by later this week for an installment of Pepperoni & Cheese stuff chicken breasts. Finger lickin' good!